Automatic Street Light Controller Circuit Using Relays and LDR
Did you ever think that
how the street lights automatically turn ON in the night and turn OFF
automatically at morning? Is there any person who comes to ON/OFF these lights?
The following circuit that described below which perform this job
automatically. This circuit employed the output from an uncomplicated
light/dark activated circuit and oblige a relay in its output which can be
further attached to switch ON/OFF a street light and electrical application in
a household also.
Many of the people have
a phobia of darkness, so to assist them in such situation, we have explained a
simple circuit. It will automatically turn on street light in the way of LEDs
or bulb coupled with relay, it is well enough to see the object nearby. This
circuit is very much easy to work and also the battery power consumed by the
circuit is very low because of the very few components used in the circuit.
The whole circuit is
based on IC CA3140 which is basically an operational amplifier which can unite
the voltage PMOS transistors to the high voltage bipolar transistor on
particular chip. LDR (Light depending resistor) whose resistance is based upon
the quantity of the light declining on it along with a few more components.
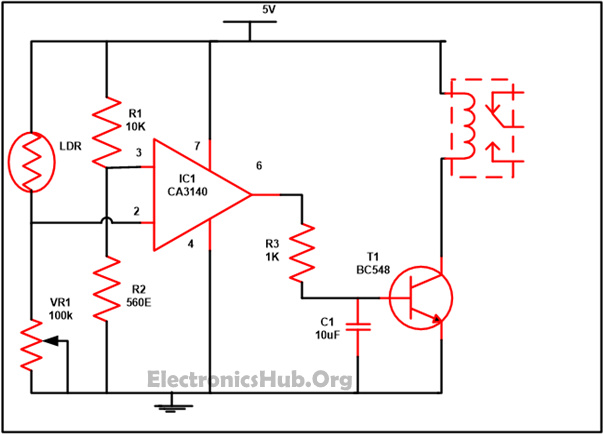
Circuit Diagram of Automatic Street Light Controller Switch Circuit
using Relays and LDR:
Automatic
Street Light Controller Switch Circuit –

Components
Used in this Circuit:
·
IC
·
CA3140 – 1
·
Resistor
·
R1 (100k) – 1
·
R2 (560E) – 1
·
R3 (1K) – 1
·
R4, R5 (100K) – 2
·
VR1 (100K) – 1
·
C1 (10uF) – 1
·
LDR – 1
·
T1 (BC548) – 1
Components Description:
LDR: LDR is a device whose sensitivity depends upon the intensity of
light falling on it. When the strength of the light falling on LDR increases
the LDR resistance decreases, while if the strength of the light falls on LDR
is decreased resistance increased. In the time of darkness or when there is no
light, the resistance of LDR is in the range of mega ohms, while in the
presence of light or in brightness in decrease by few hundred ohms.
Testing of LDR- Before
mounting any component in the circuit it is a good practice to check whether a
component works properly or not so that you can avoid consumption of time in
troubleshooting. For testing LDR set the range of multimeter in resistance
measurement. After that put the lids on the legs of LDR ( as LDR have no polarity
so you can connect any lid with leg). Measure the resistance of LDR in
the light or brightness, resistance must be low. Now cover LDR properly
so that no light beam fall in it, again measure the resistance it must be high.
If you got the same result means that LDR is good.
Resistor: It is a passive component having two terminals that are used to
manage the current flow in the circuit. A current that flows via a resistor is
directly proportional to the voltage that appeared into the resistor.
Resistors are of two
types -
i) Fixed Resistor –
having a fixed value of resistance
ii) Variable Resistor – whose value of resistance can be changed for example if we have a resistor of 5K then the value of resistance will vary from 0 to 5 k.
ii) Variable Resistor – whose value of resistance can be changed for example if we have a resistor of 5K then the value of resistance will vary from 0 to 5 k.
Value of resistance can
be calculated with the help of multimeter or with the color code that is
visible on the resistor.
Capacitor: It is a passive component with two terminals and used to store
charges. Capacitors are mad up of two conductors which are separated by
the dielectric medium flows in between. It works when potential difference
applied across the conductors polarize the dipole ions to store the charge in
the dielectric medium.
There are two types of
capacitors -
i) Polarized – They have
polarity means + and- sign marked on it. It is mainly used to store the
charges. Before troubleshooting the circuit capacitors must be fully discharged
as they have charges store in it.
ii) Non-polarized – They don’t have a polarity and can be mounted in any of the way. They are generally used to remove the noises present during the conversion of AC into DC.
ii) Non-polarized – They don’t have a polarity and can be mounted in any of the way. They are generally used to remove the noises present during the conversion of AC into DC.
Relay: It provides isolation between the controller and the device
because as we know devices may work on AC as well as on DC but they receive
signals from microcontroller which works on DC hence we require a relay to
bridge the gap. The relay is extremely useful when you need to control a large
amount of current or voltage with the small electrical signal.
Factors for Selecting an
Appropriate Relay:
·
The voltage and current required to strengthen the coil.
·
The utmost voltage which we will acquire in the output.
·
Amount of the armature.
·
Amount of contacts for the armature.
·
Number of electrical associates (N/O and N/C).
Working of Automatic
Street Light Controller Switch Circuit:
The working of circuit
is very much easy to understand. In this circuit, we used IC CA3140 which
is basically an operational amplifier. Pins 2 and 3 of these IC are used to
compare the voltage and give us the output in return ie it works as a potential
divider in its inverting and non-inverting inputs (pins 2 and 3). In this LDR
and VR1 form one potential divider which is used to provide a variable voltage
at the inverting input (that is 2) and the second potential divider is built
around non-inverting input (pin 3) with the help of R1 and R2 which will grant
half of the supply voltage to non inverting pin.
As we know property of
LDR that during the time of day resistance is low therefore voltage at the
inverting input ( IE pin 2) is higher than the voltage at the non-inverting
input (pin3) hence the output at the pin6 is low so the transistor goes into
the cutoff state which means LED or bulb will not glow.
But in dimness or in
night we know that resistance of LDR is high hence voltage at inverting
input pin 2 of the IC CA3140 decreases than the non inverting input pin 3 as a
result output pin 6 moves to high state which make transistor to
conduct and the LED or bulb associated to it start simmering.
We need to pay attention
while connecting relay with bulb. As different bulbs have different wattage, so
it must support the relay or else relay will not energize.
http://www.hubcity.net
No comments:
Post a Comment